I recently started playing around with the Llama2 models and was having issue with the llama-cpp-python bindings. Specifically, I could not get the GPU offloading to work despite following the directions for the cuBLAS installation. I had this issue both on Ubuntu and Windows.
Solution for Ubuntu
The issue turned out to be that the NVIDIA CUDA toolkit already needs to be installed on your system and in your path before installing llama-cpp-python. If llama-cpp-python cannot find the CUDA toolkit, it will default to a CPU-only installation. I got the installation to work with the commands below. If you have tried to install the package before, you will most likely need the --no-cache-dir option to get it to work.
conda create --name llama-env python=3.9
conda activate llama-env
conda install -c "nvidia/label/cuda-11.8.0" cuda-toolkit cuda-nvcc -y --copy
CMAKE_ARGS="-DLLAMA_CUBLAS=on" FORCE_CMAKE=1 pip install --upgrade --force-reinstall llama-cpp-python --no-cache-dir
There will be multiple signs that the installation with GPU support was successful. You will see the detected GPUs when you import the package.
>>> from llama_cpp import Llama
ggml_init_cublas: found 2 CUDA devices:
  Device 0: NVIDIA GeForce GTX 1080 Ti, compute capability 6.1
  Device 1: NVIDIA GeForce GTX 1080 Ti, compute capability 6.1
Additionally, you will see the GPU offloading and model BLAS status after loading a model.
>>> llm = Llama(model_path="./llama-2-7b/ggml-model-f16.gguf", n_gpu_layers=-1)
ggml_cuda_set_main_device: using device 0 (NVIDIA GeForce GTX 1080 Ti) as main device
llm_load_tensors: mem required  =  250.09 MB (+  256.00 MB per state)
llm_load_tensors: offloading 32 repeating layers to GPU
llm_load_tensors: offloading non-repeating layers to GPU
llm_load_tensors: offloading v cache to GPU
llm_load_tensors: offloading k cache to GPU
llm_load_tensors: offloaded 35/35 layers to GPU
llm_load_tensors: VRAM used: 12860 MB
...................................................................................................
llama_new_context_with_model: kv self size  =  256.00 MB
llama_new_context_with_model: compute buffer total size =   71.97 MB
llama_new_context_with_model: VRAM scratch buffer: 70.50 MB
AVX = 1 | AVX2 = 1 | AVX512 = 0 | AVX512_VBMI = 0 | AVX512_VNNI = 0 | FMA = 1 | NEON = 0 | ARM_FMA = 0 | F16C = 1 | FP16_VA = 0 | WASM_SIMD = 0 | BLAS = 1 | SSE3 = 1 | SSSE3 = 1 | VSX = 0 |
Solution for Windows
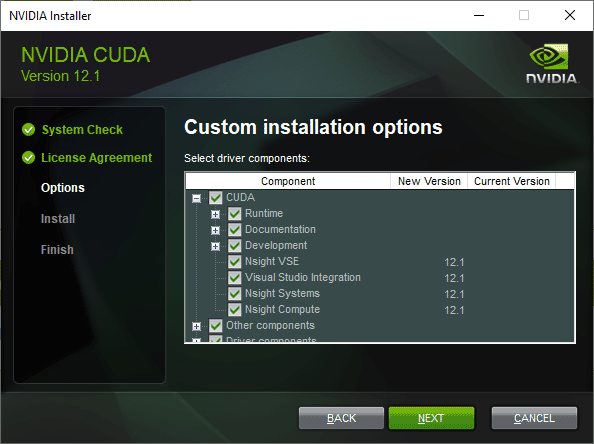
The solution for Windows is similar to the solution for Ubuntu. The main difference is that you need to install the CUDA toolkit from the NVIDIA website and make sure the Visual Studio Integration is included with the installation.

I used the CUDA 12.1 version. You will also need to have installed the Visual Studio Build Tools prior to installing CUDA. I used the 2022 version. Once both of those are installed and you have restarted the machine, you will need to move some files from the CUDA installation to the VS Build Tools. If the files are missing from the VS Build Tools, you will get an error when trying to install llama-cpp-python.
CMake Error at C:/Users/mriedl/AppData/Local/Temp/pip-build-env-vz70r577/normal/Lib/site-packages/cmake/data/share/cmake-3.27/Modules/CMakeDetermineCompilerId.cmake:503 (message):
        No CUDA toolset found.
The files you need to move are listed below. You can find them in the following locations.
CUDA 12.1.props
CUDA 12.1.targets
CUDA 12.1.xml
Nvda.Build.CudaTasks.v12.1.dll

C:\Program Files\NVIDIA GPU Computing Toolkit\CUDA\v12.1\extras\visual_studio_integration\MSBuildExtensions
C:\Program Files (x86)\Microsoft Visual Studio\2022\BuildTools\MSBuild\Microsoft\VC\v170\BuildCustomizations
Once you have done that, the commands below should work for Windows.
conda create --name llama-env python=3.9
conda activate llama-env
set FORCE_CMAKE=1 && set CMAKE_ARGS=-DLLAMA_CUBLAS=ON
pip install --upgrade --force-reinstall llama-cpp-python --no-cache-dir
Conclusion
This took me a little while to figure out and did not easily find other resources addressing the issue. Hope this helps someone else.